> ## Documentation Index
> Fetch the complete documentation index at: https://help.emaillove.com/llms.txt
> Use this file to discover all available pages before exploring further.
# Export Figma emails to Marketo
> Export email designs from Figma into Adobe Marketo Engage as email templates with the Email Love plugin.
The Email Love Figma Plugin integrates with Adobe Marketo Engage, allowing you to export your email designs directly from Figma into your Marketo account as editable templates. This guide walks you through the complete setup and export process.
## First-Time Setup: Configure the Marketo API
To export directly from the plugin to Marketo, you'll need three credentials: your **REST API Endpoint URL**, **Client ID**, and **Client Secret**.
1. Log into your Marketo account
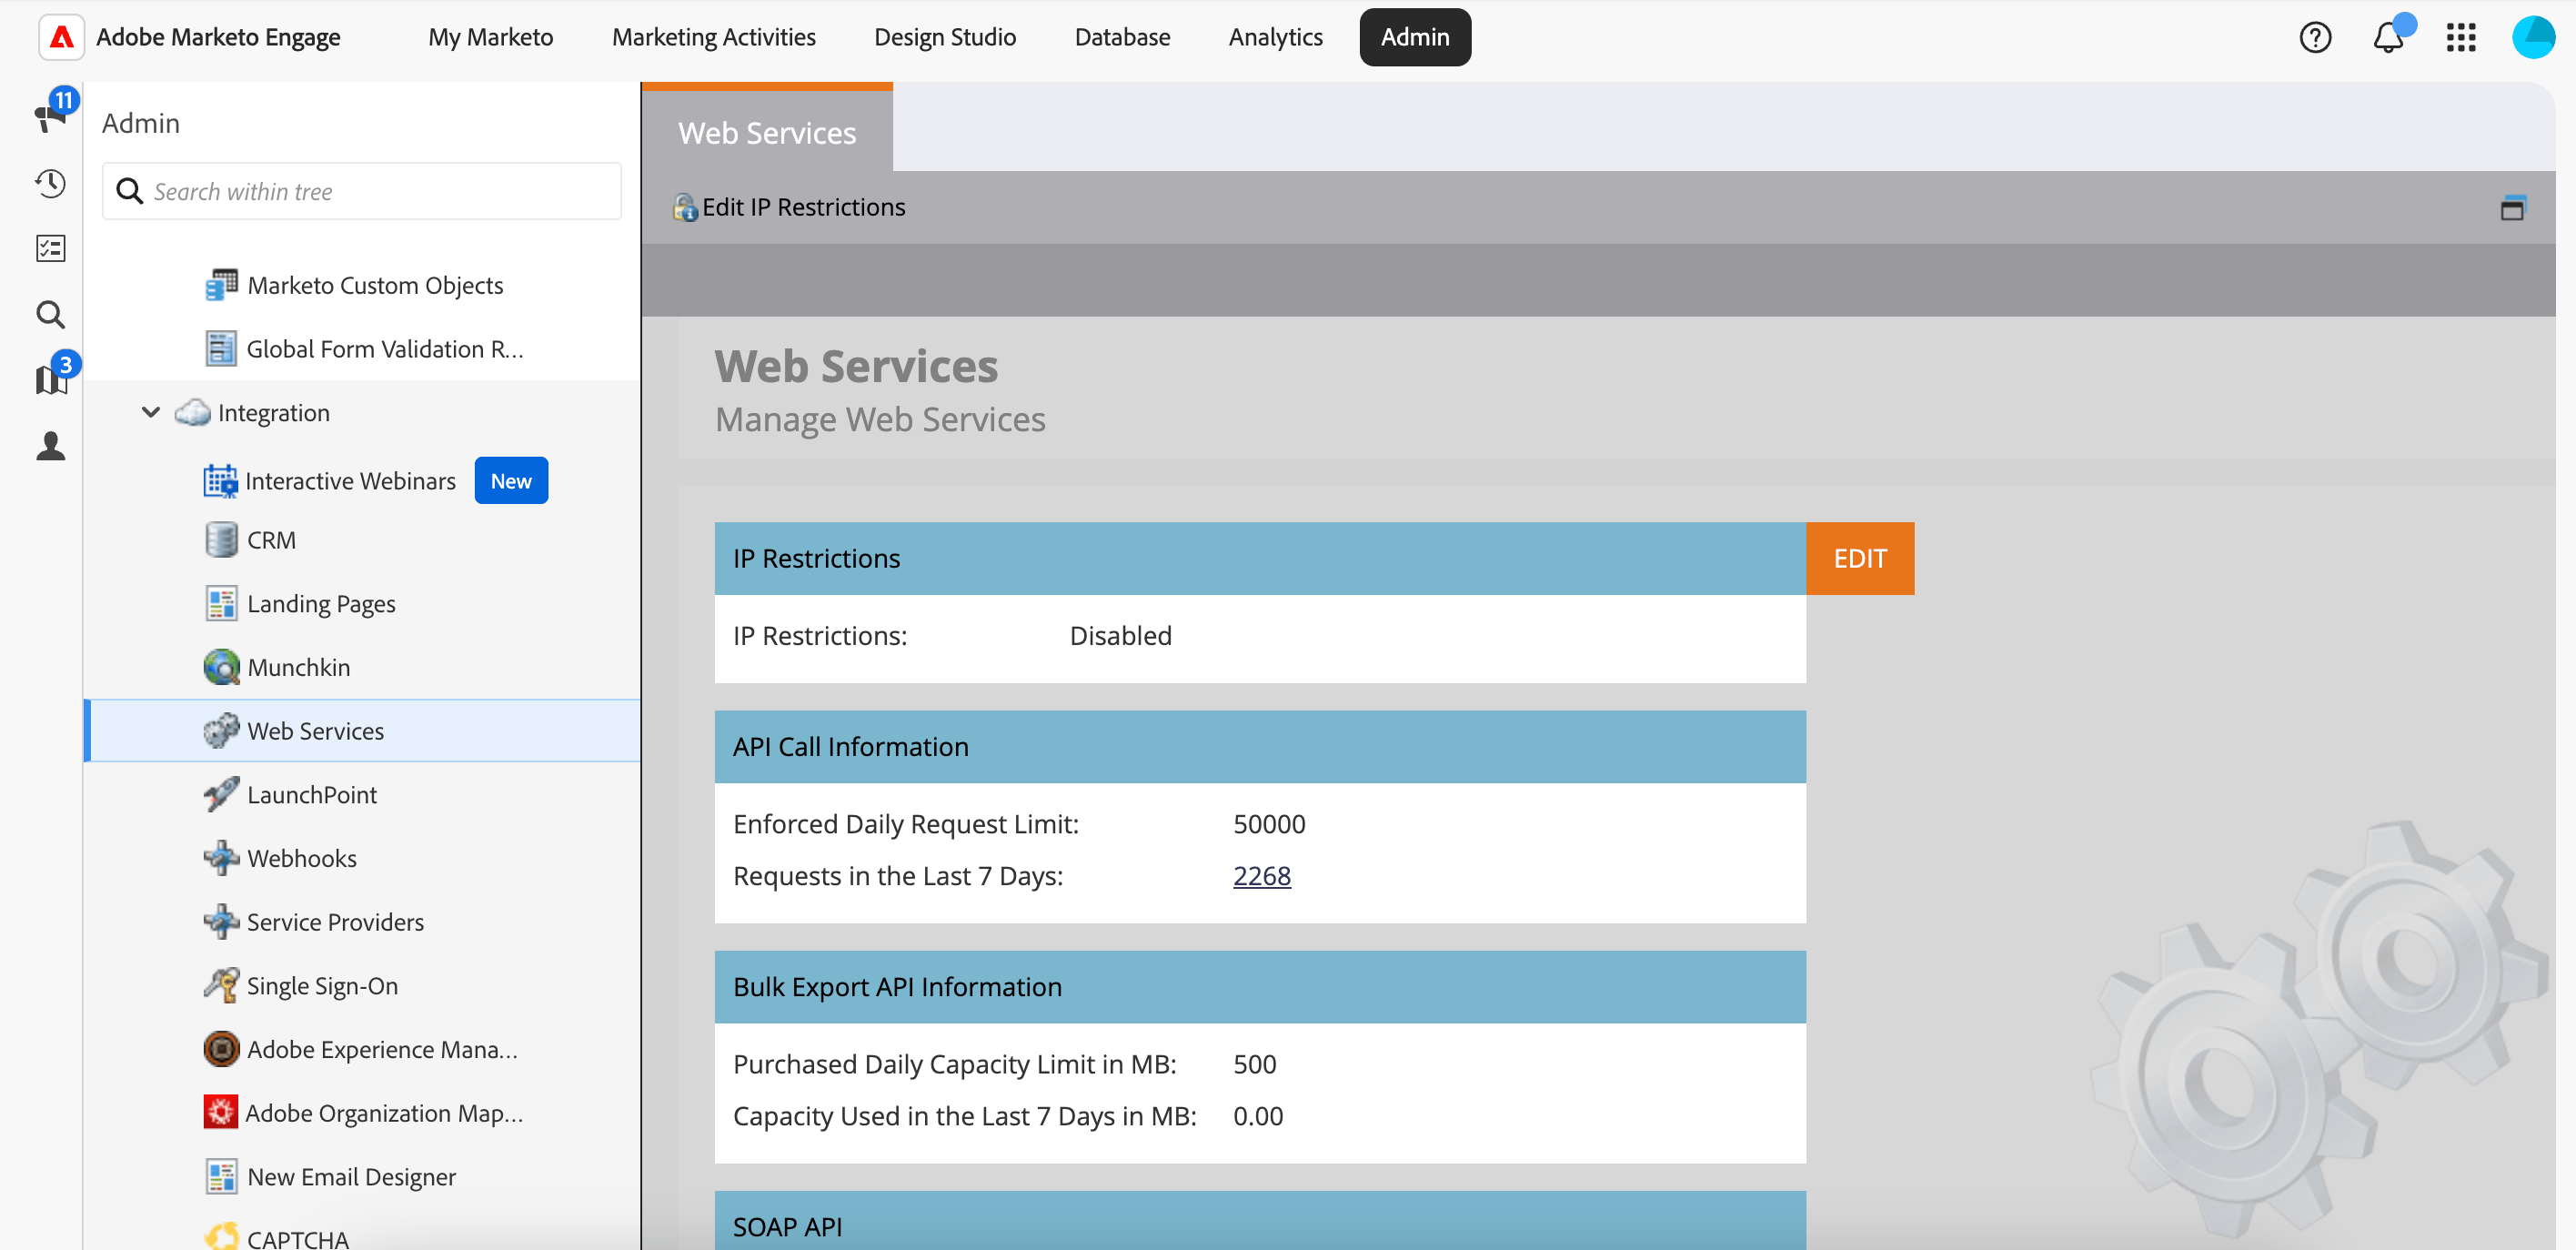
2. Navigate to **Admin** > **Web Services**
3. Under the **REST API** section, copy the **Endpoint URL** to your clipboard
The REST API Endpoint URL looks something like `https://xxx-xxx-xxx.mktorest.com/`. You'll paste this into the plugin later.
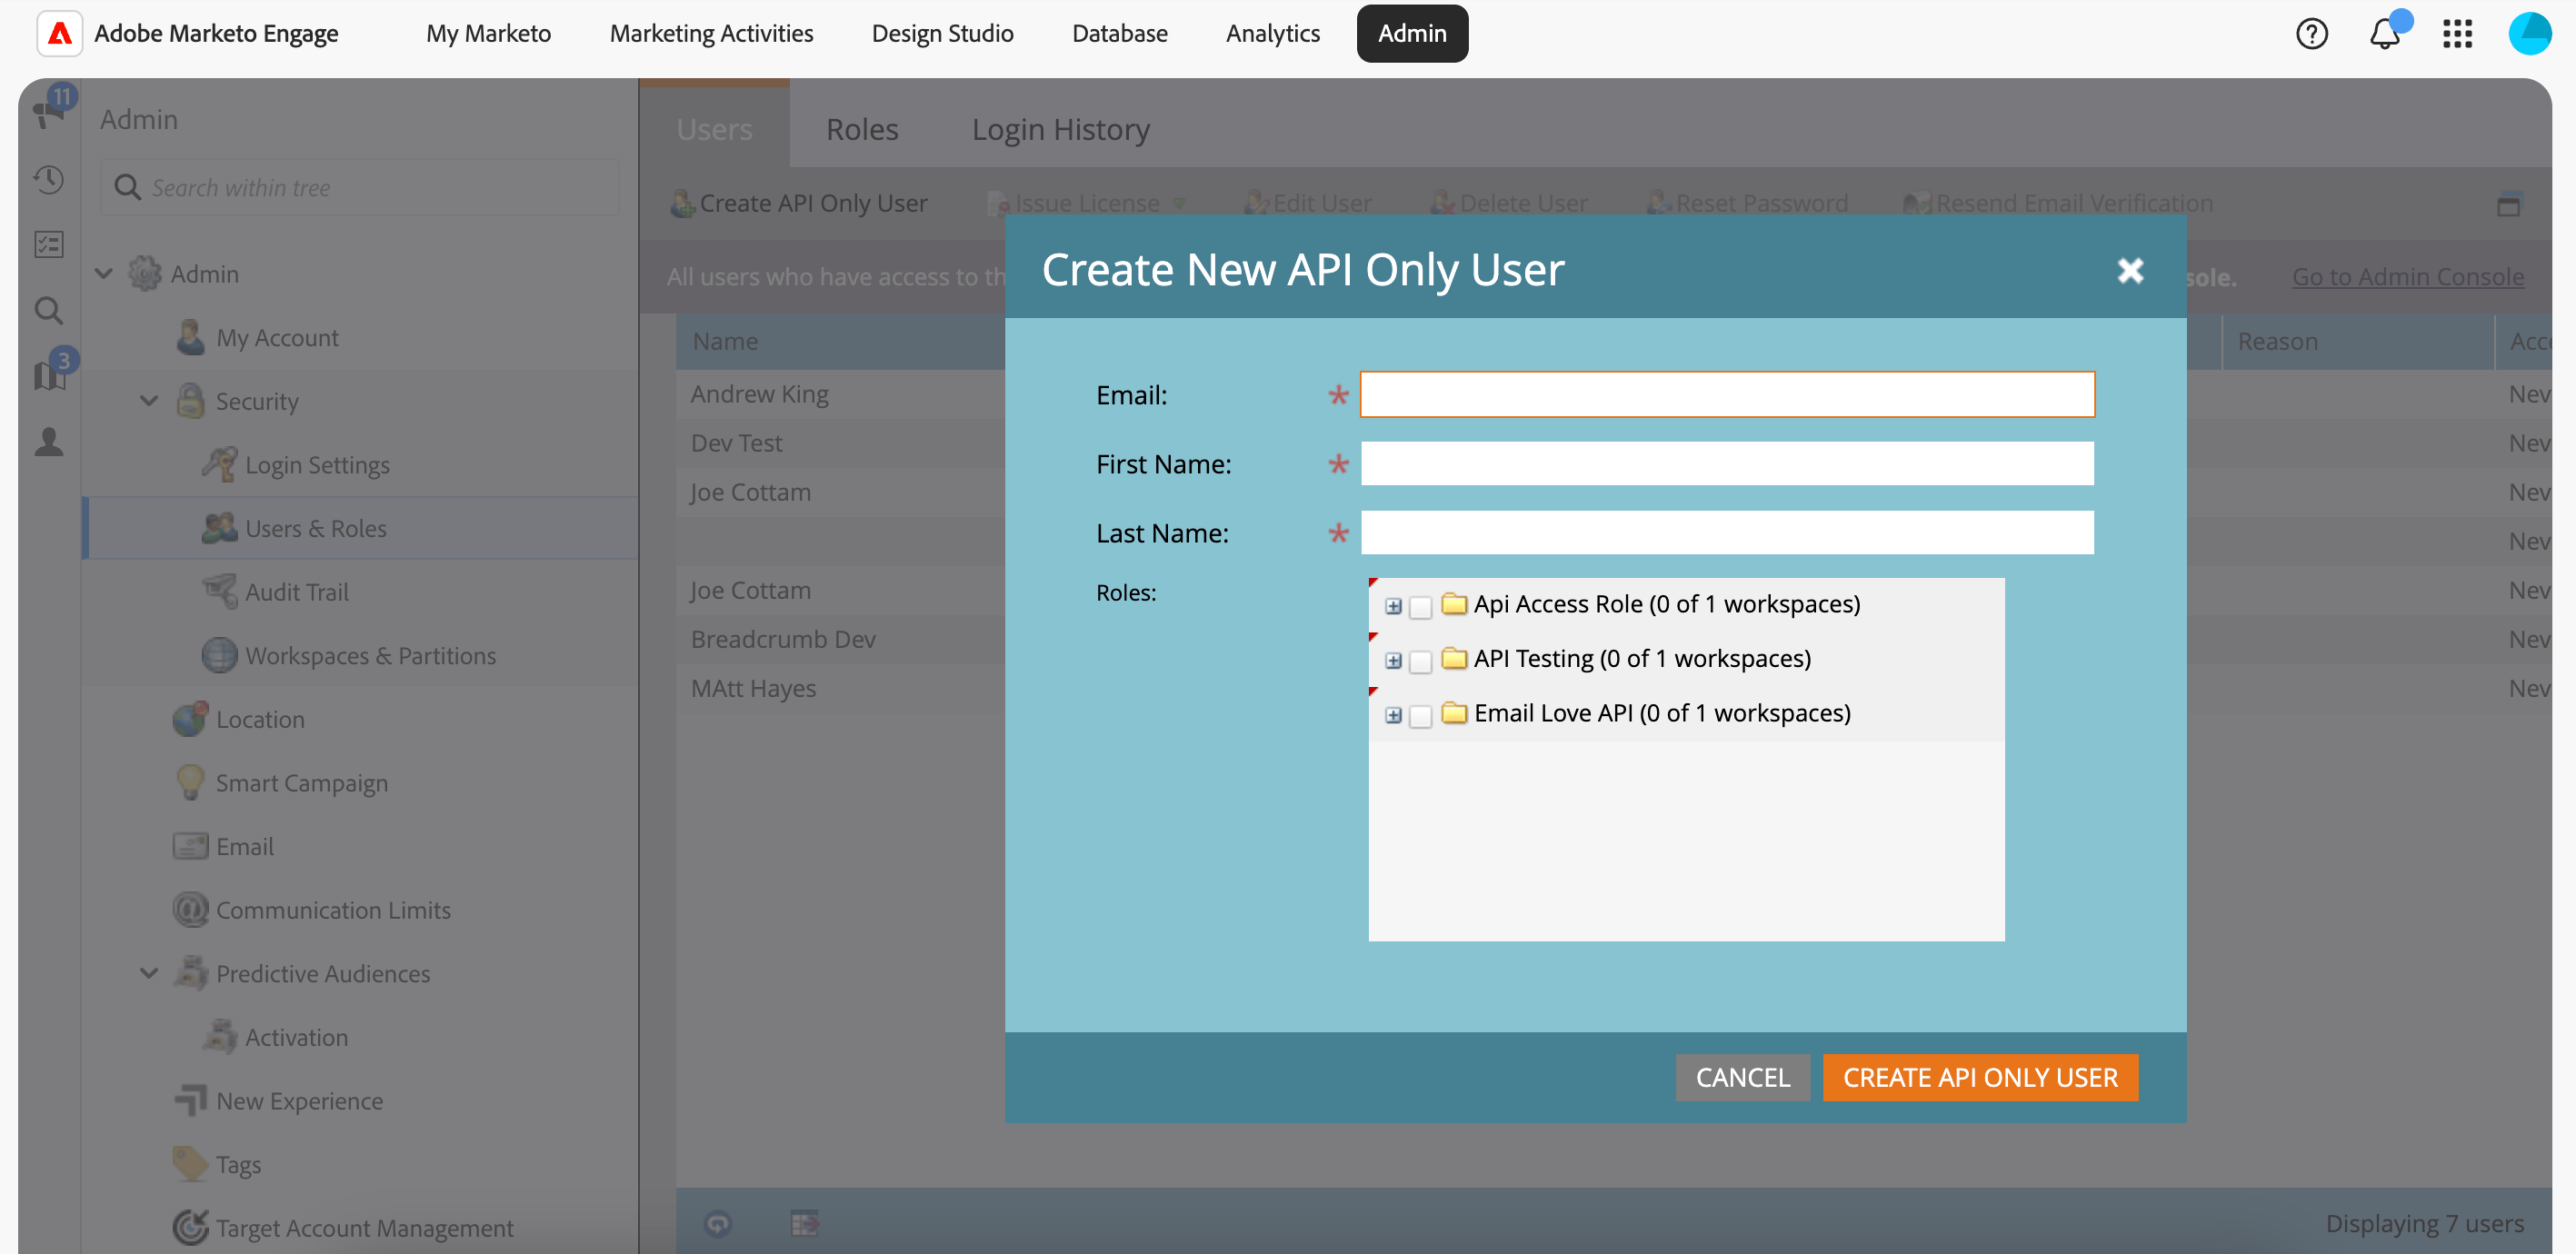
 1. In **Admin**, go to **Users & Roles** > **Roles**
2. Create a **New Role**
3. Under the **Access API** section, enable **Read-Write Assets** permissions
4. Click **Create** to save the role
5. Ensure you have an **API Only** user account assigned to this role. If not, create one under **Users** and set the account type to **API Only**
1. In **Admin**, go to **Users & Roles** > **Roles**
2. Create a **New Role**
3. Under the **Access API** section, enable **Read-Write Assets** permissions
4. Click **Create** to save the role
5. Ensure you have an **API Only** user account assigned to this role. If not, create one under **Users** and set the account type to **API Only**
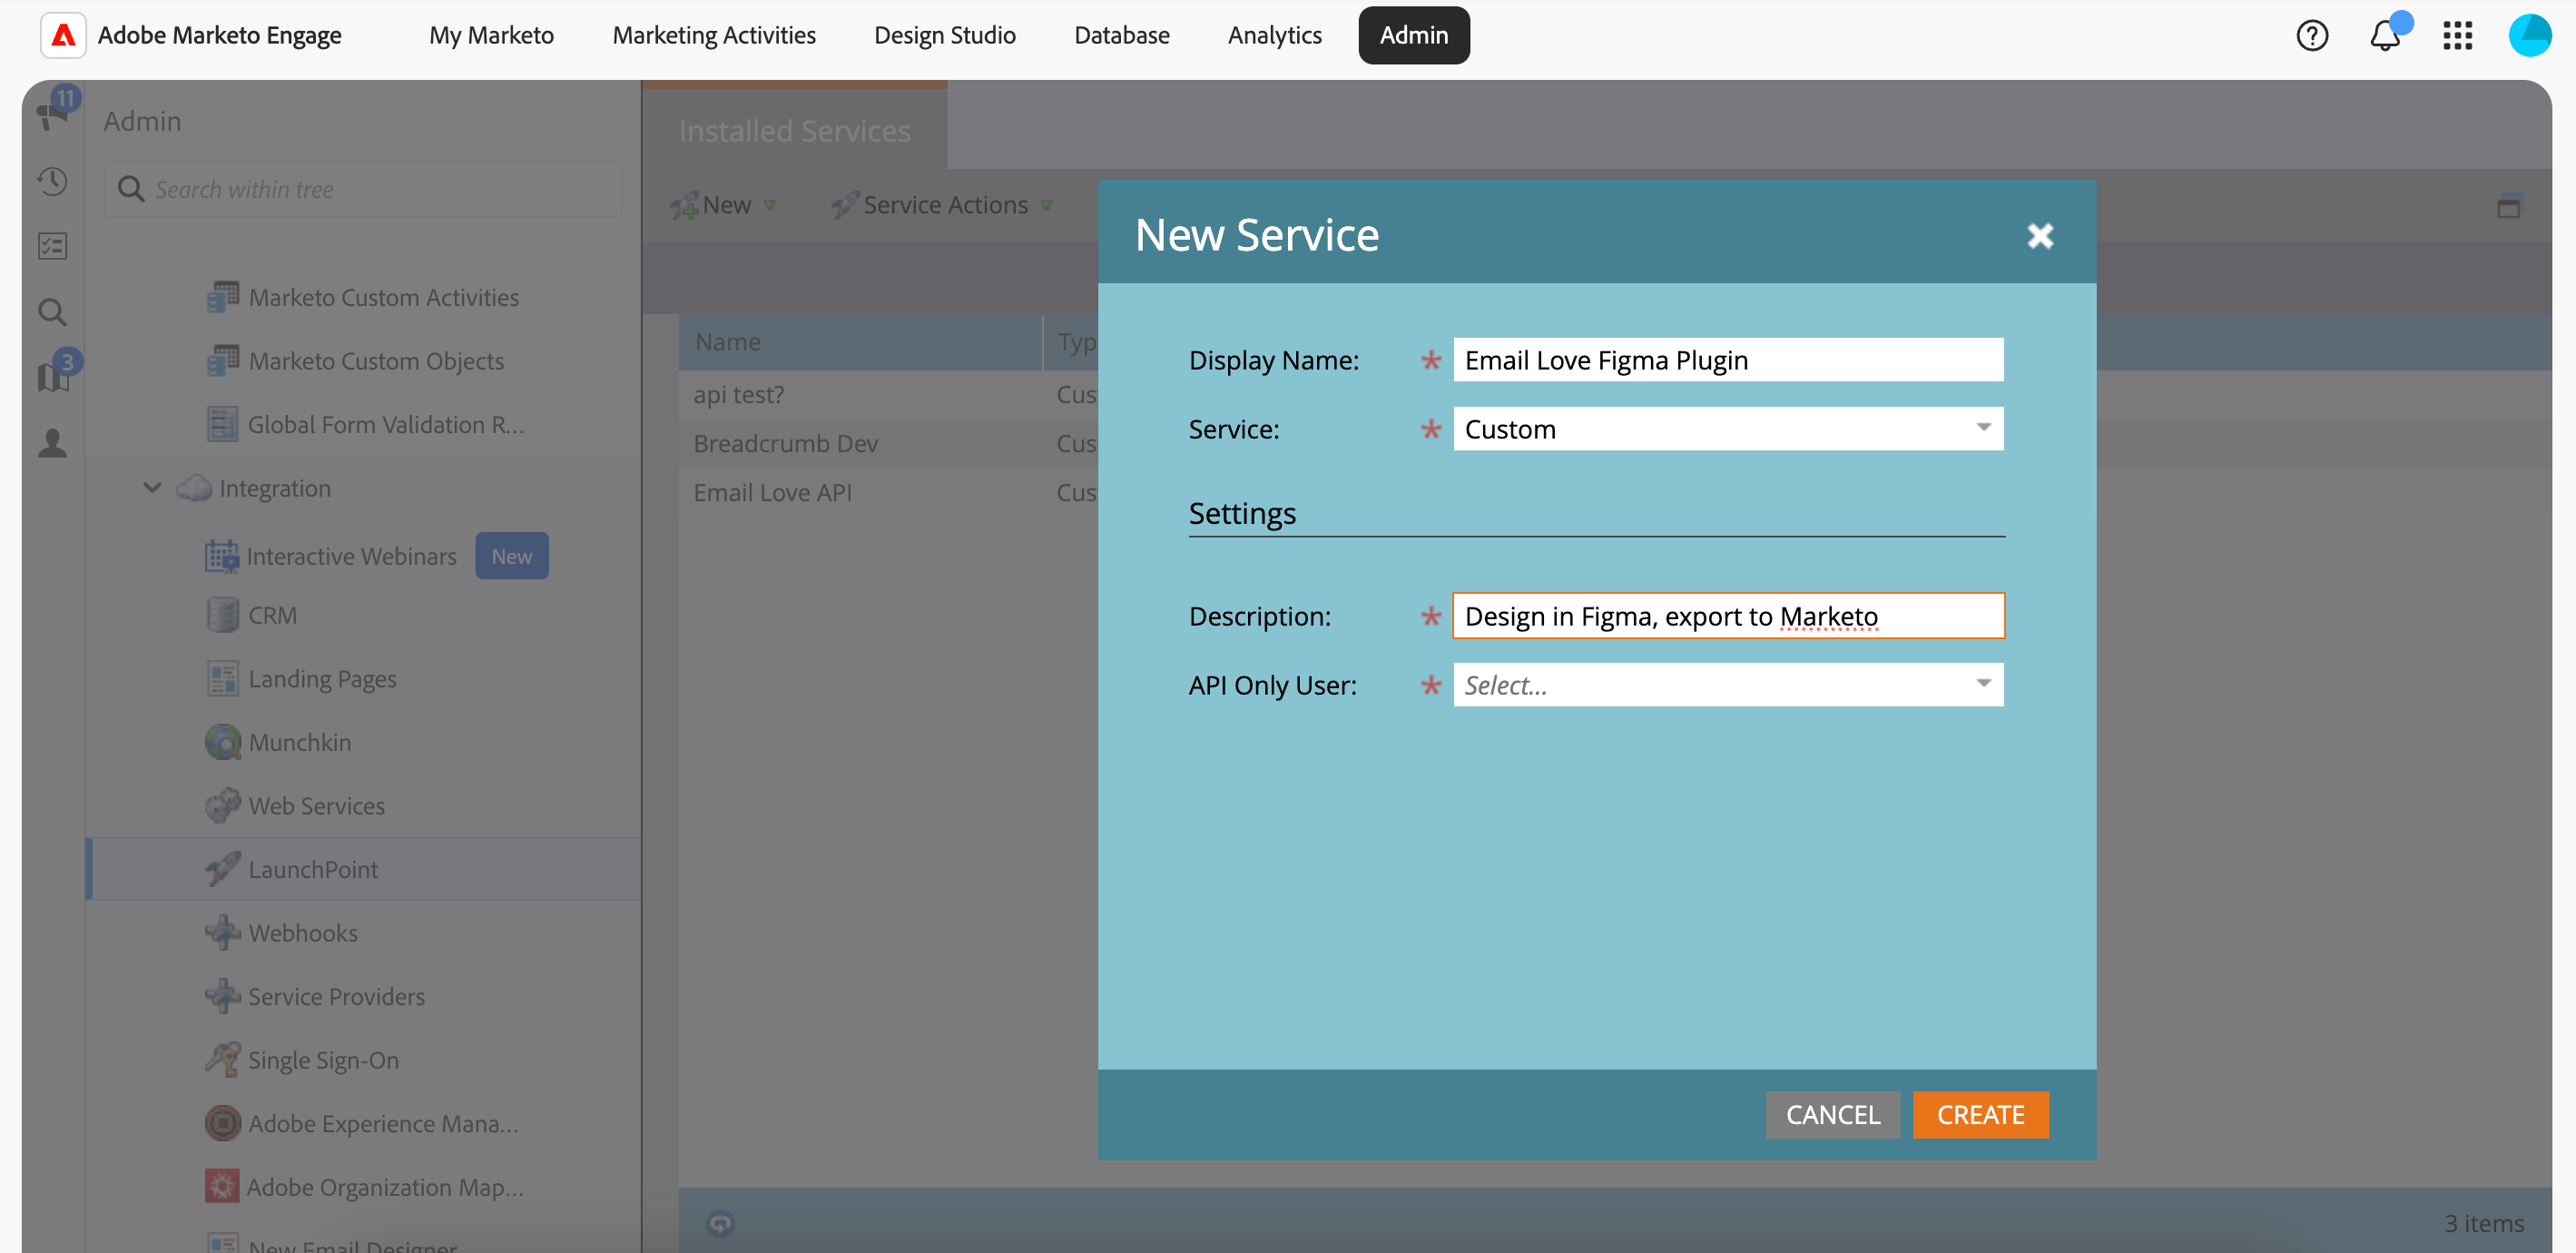
 1. In **Admin**, go to **LaunchPoint** (under Integration)
2. Click **New** > **New Service**
3. Give the service a name (e.g., "Email Love Plugin")
4. Set the **Service** type to **Custom**
5. Select your **API Only** user from the dropdown
6. Click **Create**
7. Once created, click **View Details** to reveal your **Client ID** and **Client Secret**
8. Copy both values. You'll need them in the next step.
1. In **Admin**, go to **LaunchPoint** (under Integration)
2. Click **New** > **New Service**
3. Give the service a name (e.g., "Email Love Plugin")
4. Set the **Service** type to **Custom**
5. Select your **API Only** user from the dropdown
6. Click **Create**
7. Once created, click **View Details** to reveal your **Client ID** and **Client Secret**
8. Copy both values. You'll need them in the next step.
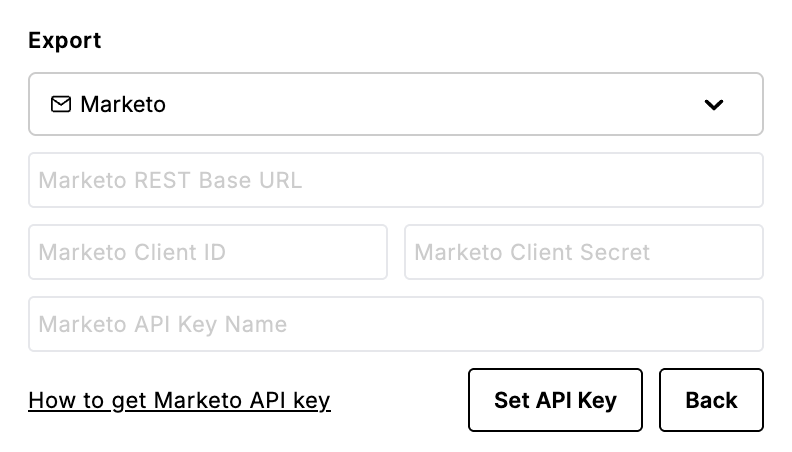
 1. Open the Email Love Figma Plugin
2. Click **Export** in the top right corner
3. Select **Marketo (API)** from the dropdown
4. Paste your three credentials:
* **REST API Endpoint URL**
* **Client ID**
* **Client Secret**
5. Test the connection to verify authentication
1. Open the Email Love Figma Plugin
2. Click **Export** in the top right corner
3. Select **Marketo (API)** from the dropdown
4. Paste your three credentials:
* **REST API Endpoint URL**
* **Client ID**
* **Client Secret**
5. Test the connection to verify authentication
 ## Exporting to Marketo
Once your API connection is configured:
1. Ensure your email design is finalized and the frame is selected. You'll need an Email Love Footer with an Unsubscribe link for the export to work.
2. Click the **Export** button in the plugin
3. Select **Marketo (API)** from the dropdown
4. Click **Upload to Marketo**
5. Wait for the upload to complete. You'll see a confirmation with a link to your template in Marketo.
## Finding and Approving Your Template
After export, your template appears in Marketo's Design Studio.
1. Navigate to **Design Studio** in the left sidebar
2. Open the **Email Templates** folder
3. Find your newly exported template
4. Click on the template, then click **Approve and Close**
5. A green checkmark confirms the template is approved and ready to use
Templates must be approved before they can be used to create new emails. If you don't see your template when creating a new email, check that it's been approved in Design Studio.
## Exporting to Marketo
Once your API connection is configured:
1. Ensure your email design is finalized and the frame is selected. You'll need an Email Love Footer with an Unsubscribe link for the export to work.
2. Click the **Export** button in the plugin
3. Select **Marketo (API)** from the dropdown
4. Click **Upload to Marketo**
5. Wait for the upload to complete. You'll see a confirmation with a link to your template in Marketo.
## Finding and Approving Your Template
After export, your template appears in Marketo's Design Studio.
1. Navigate to **Design Studio** in the left sidebar
2. Open the **Email Templates** folder
3. Find your newly exported template
4. Click on the template, then click **Approve and Close**
5. A green checkmark confirms the template is approved and ready to use
Templates must be approved before they can be used to create new emails. If you don't see your template when creating a new email, check that it's been approved in Design Studio.
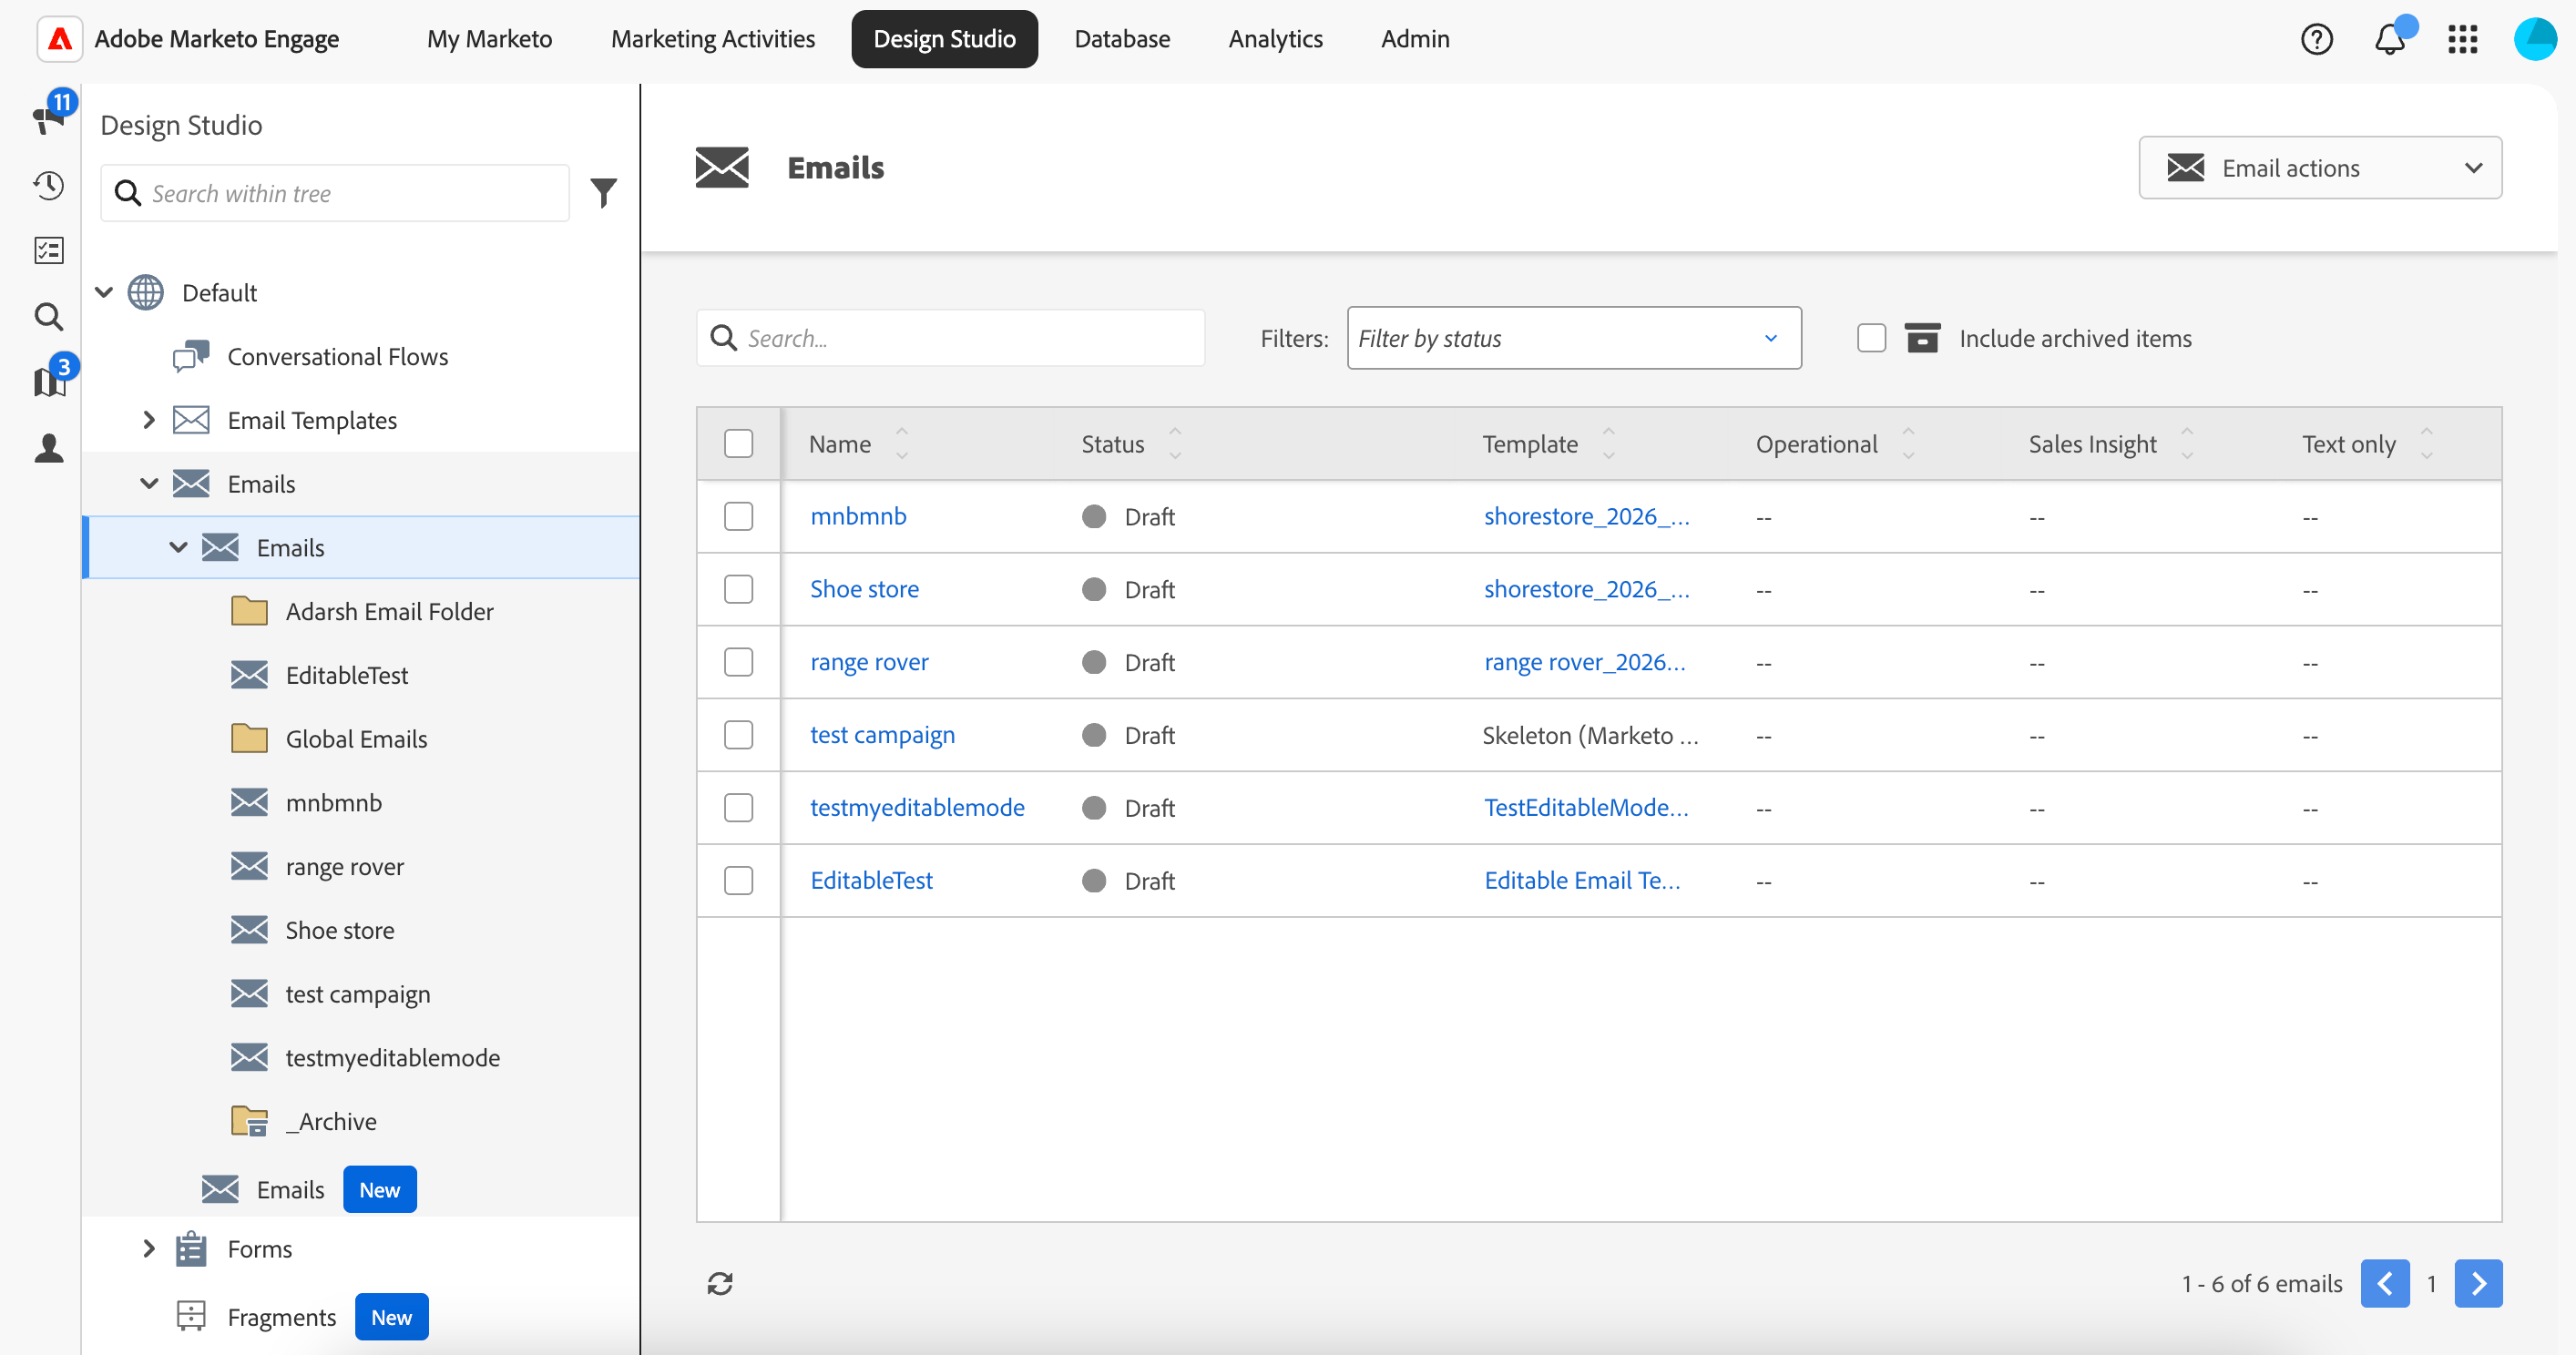 ## Creating a New Email from Your Template
With your template approved:
1. Navigate to **Marketing Activities**
2. Select or create a program, then choose **New** > **New Local Asset** > **Email**
3. Give your email a name and description
4. In the template selection screen, go to **My Templates**
5. Select your exported template
6. Click **Create**
## Editing Content in Marketo
Your exported template preserves editable content areas, so your team can update text and images directly in Marketo's email editor without breaking the responsive design.
1. Open your new email
2. Click on any text area to edit the content
3. The editor will appear, allowing you to modify text, formatting, and links
4. Click on image areas to swap images
5. When finished, approve the email to make it available for sending
The Email Love plugin structures your template so that text and image areas are editable in Marketo while the structural layout stays locked. This means your marketing team can update content without accidentally breaking the responsive code.
## Alternative: Manual Zip Export
If you prefer to upload your HTML manually rather than using the API integration:
1. Click the **Export** button in the plugin
2. Select **Marketo (Zip)** from the dropdown
3. Click **Export for Marketo** to download a zip file containing your HTML template
4. In Marketo, go to **Design Studio** > **Email Templates**
5. Click **New Email Template** and paste in the HTML code from the exported file
6. Approve the template to make it available
The API method is recommended as it's faster and eliminates manual copy/paste steps.
## Troubleshooting
### Common Issues
* **Authentication Failed:** Verify your Client ID, Client Secret, and REST API Endpoint URL are entered correctly. Make sure the API user has **Read-Write Assets** permissions.
* **Permission Denied:** Ensure your API role includes the **Access API** > **Read-Write Assets** permission. Go to **Admin** > **Users & Roles** > **Roles** to verify.
* **Template not appearing in Design Studio:** Wait a moment and refresh. The upload may take a few seconds to process.
* **Template shows as "Draft":** Click on the template and select **Approve and Close** before creating emails from it.
* **Images not loading:** The plugin automatically hosts images during export. If images appear broken, check your internet connection and try re-exporting.
* **Editable areas not showing in editor:** Ensure you're using Email Love components (sections, columns, text, images) rather than plain Figma frames. The plugin maps these to Marketo's editable regions.
### Support
Need help? Contact our expert team through:
* **Discord**: [Join our Discord support channel](https://discord.gg/ANv9PjVdzP)
* **Email**: Contact us via [hello@emaillove.com](mailto:hello@emaillove.com) with any questions
* **Book a meeting with us**: [Put time on our calendar](https://calendar.notion.so/meet/matthayes/matthayes)
## Benefits of This Integration
* **Streamlined Workflow**: Design in Figma, deploy to Marketo instantly
* **Brand Consistency**: Maintain design system integrity across all campaigns
* **Editable Templates**: Marketing teams can update content without breaking responsive code
* **Time Savings**: Eliminate manual HTML coding and uploading
* **Easy migration between platforms:** Easily migrate to any marketing platform by not storing all of your emails inside of your ESP
* **Expert Support**: Backed by Email Love's experienced team
## Related Articles
* [Export Overview](/plugin/export/overview): Understand all export options and how the plugin converts your Figma design to HTML
* [Image Hosting](/plugin/images/hosting): How the plugin handles image hosting during export
* [Personalize your email content with dynamic content](/plugin/components/dynamic-content): Use Marketo tokens and Velocity scripting for personalization
## Creating a New Email from Your Template
With your template approved:
1. Navigate to **Marketing Activities**
2. Select or create a program, then choose **New** > **New Local Asset** > **Email**
3. Give your email a name and description
4. In the template selection screen, go to **My Templates**
5. Select your exported template
6. Click **Create**
## Editing Content in Marketo
Your exported template preserves editable content areas, so your team can update text and images directly in Marketo's email editor without breaking the responsive design.
1. Open your new email
2. Click on any text area to edit the content
3. The editor will appear, allowing you to modify text, formatting, and links
4. Click on image areas to swap images
5. When finished, approve the email to make it available for sending
The Email Love plugin structures your template so that text and image areas are editable in Marketo while the structural layout stays locked. This means your marketing team can update content without accidentally breaking the responsive code.
## Alternative: Manual Zip Export
If you prefer to upload your HTML manually rather than using the API integration:
1. Click the **Export** button in the plugin
2. Select **Marketo (Zip)** from the dropdown
3. Click **Export for Marketo** to download a zip file containing your HTML template
4. In Marketo, go to **Design Studio** > **Email Templates**
5. Click **New Email Template** and paste in the HTML code from the exported file
6. Approve the template to make it available
The API method is recommended as it's faster and eliminates manual copy/paste steps.
## Troubleshooting
### Common Issues
* **Authentication Failed:** Verify your Client ID, Client Secret, and REST API Endpoint URL are entered correctly. Make sure the API user has **Read-Write Assets** permissions.
* **Permission Denied:** Ensure your API role includes the **Access API** > **Read-Write Assets** permission. Go to **Admin** > **Users & Roles** > **Roles** to verify.
* **Template not appearing in Design Studio:** Wait a moment and refresh. The upload may take a few seconds to process.
* **Template shows as "Draft":** Click on the template and select **Approve and Close** before creating emails from it.
* **Images not loading:** The plugin automatically hosts images during export. If images appear broken, check your internet connection and try re-exporting.
* **Editable areas not showing in editor:** Ensure you're using Email Love components (sections, columns, text, images) rather than plain Figma frames. The plugin maps these to Marketo's editable regions.
### Support
Need help? Contact our expert team through:
* **Discord**: [Join our Discord support channel](https://discord.gg/ANv9PjVdzP)
* **Email**: Contact us via [hello@emaillove.com](mailto:hello@emaillove.com) with any questions
* **Book a meeting with us**: [Put time on our calendar](https://calendar.notion.so/meet/matthayes/matthayes)
## Benefits of This Integration
* **Streamlined Workflow**: Design in Figma, deploy to Marketo instantly
* **Brand Consistency**: Maintain design system integrity across all campaigns
* **Editable Templates**: Marketing teams can update content without breaking responsive code
* **Time Savings**: Eliminate manual HTML coding and uploading
* **Easy migration between platforms:** Easily migrate to any marketing platform by not storing all of your emails inside of your ESP
* **Expert Support**: Backed by Email Love's experienced team
## Related Articles
* [Export Overview](/plugin/export/overview): Understand all export options and how the plugin converts your Figma design to HTML
* [Image Hosting](/plugin/images/hosting): How the plugin handles image hosting during export
* [Personalize your email content with dynamic content](/plugin/components/dynamic-content): Use Marketo tokens and Velocity scripting for personalization