

Already have a library of emails or components? Use the Claude or Codex migration workflow before uploading modules one by one. It audits repeated blocks, builds the foundations first, and keeps the source read-only.
How it works in 4 steps
- Create a design system inside the plugin and give it a name.
- Upload your Figma components into the predefined sections (Header, Hero, Single Column, etc.).
- Sync the design system so AI Studio and Builder can use it.
- Use it: build emails by hand in Figma, generate from a campaign brief, or hand it to your team via the Builder.
Before you start
Make sure you have:- The Email Love Figma plugin installed and you’re signed in with your license
- A Figma file with your email components on the canvas, named clearly
- An idea of which brand or email type this design system is for. Each brand usually deserves its own.
- On an Email Love Builder workspace, the Design System Admin right. Creating, uploading, syncing, and deleting need it. See Who can change a design system.
Step 1: Create your design system
1
Open the design system dropdown
In the plugin, click the design system dropdown in the top left. It shows Default out of the box.
2
Select Manage your design systems
Then click Create a Design System.
3
Name it
Give it a descriptive name like Acme Brand Emails or Transactional Emails.
4
Click Create Design System
Your new design system now appears in the top-left dropdown with empty predefined sections, ready to populate.
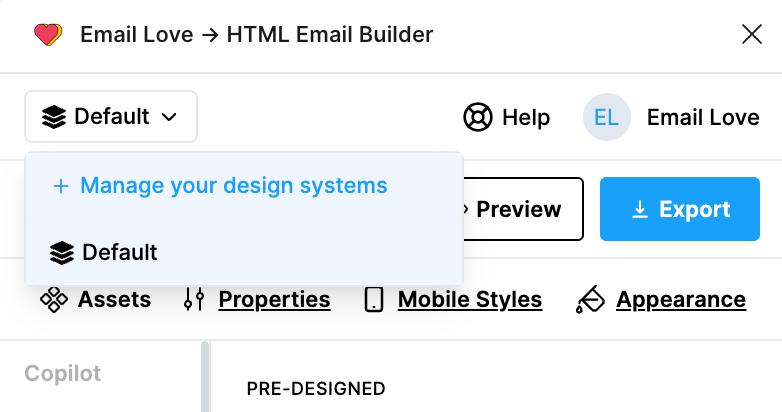
The Default design system is available out of the box. You can use it as-is to get started quickly, or skip it and create your own.
Step 2: Upload your components
Now you fill the design system by uploading components from your Figma canvas into the matching predefined sections.Uploading components to a design system is available on a paid plan. On a free account the Upload control does not appear in the Assets panel, so this step is where a free account stops. Everything up to it, including building and previewing, works on any plan.
Prep your components in Figma first
- Each component should be a clearly defined element: a header, footer, hero, content block, CTA, etc.
- Select the Wrapper, not what’s inside it. A design system component is one Wrapper (an
mj-wrapper). You can also upload several Wrappers at once, or a whole email frame. Anything below Wrapper level, like a Section or a Column, leaves the Upload button greyed out. See modules vs. email templates for the full picture. - Name your Figma layers descriptively. Those names carry over into the design system.
Then upload them
1
Select your design system
Pick it from the top-left dropdown in the plugin. The plugin remembers this choice between sessions, so you only need to pick it again when you switch to a different design system.
2
Open the predefined section you want to upload to
For example Header, Single Column, or Footer. It’ll be empty if this is a new design system.
3
Select the component(s) on the Figma canvas
Select the component(s) you want to save.
4
Click the Upload button inside that section
The plugin will show an upload summary with success and failure counts. When you upload several components at once, they upload one at a time, and the summary appears after the last one finishes.
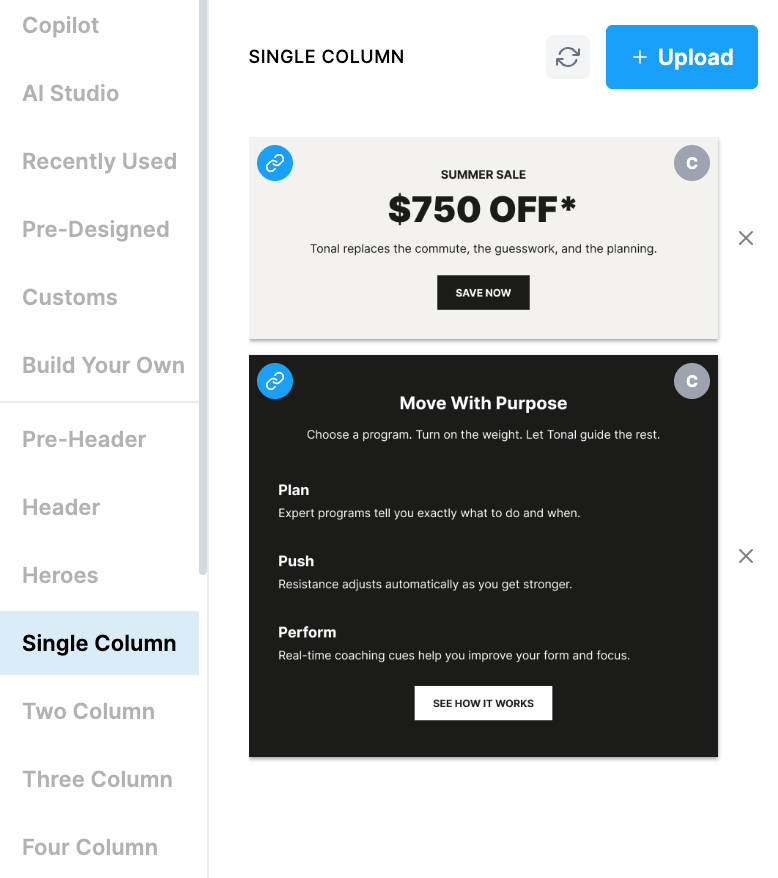
Step 3: Sync for AI
After uploading, sync your design system so it’s available to Generate from Brief and Builder.1
Open Generate from Brief
In the plugin, go to AI Studio, then Generate from Brief.
2
Select the design system
Pick the one you want to sync from the dropdown.
3
Click Sync Template Design
Wait for the loading indicator to finish.
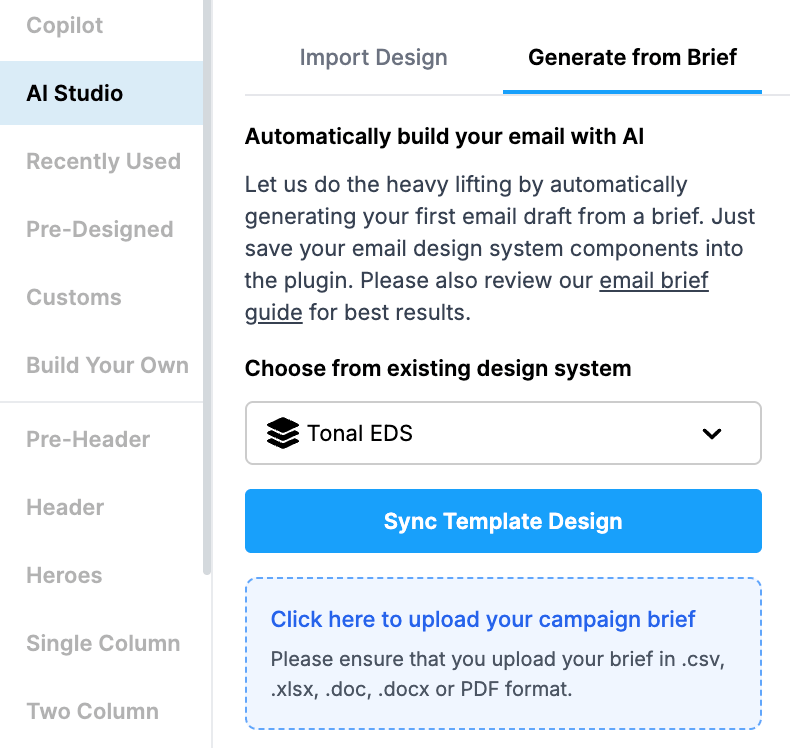
Step 4: Use your design system
There are three ways to put it to work:- Build by hand in Figma: open any section, pick a component, and drop it into your email frame.
- Generate from Brief: write a campaign brief in AI Studio and let it assemble the email using your synced components.
- Email Love Builder: sync your design system to the Builder for non-designers to build emails with a drag-and-drop interface.
The 13 predefined sections
You can’t create custom sections. Pick whichever predefined section best matches each component:- Header: Email headers and navigation bars
- Heroes: Hero banners and featured image sections
- Single Column: Single-column text and content blocks
- Two Column: Two-column layouts
- Three Column: Three-column layouts
- Four Column: Four-column layouts
- Buttons: CTA buttons and button groups
- Reviews: Testimonials, quotes, and review sections
- Images: Image-focused sections and galleries
- Lists: List-style content blocks
- Order Tables: Order summaries and table layouts
- Footer: Email footers
- Code: Raw code/HTML sections
Managing & editing
View what’s in a design system
- See all your design systems listed with their sections.
- Each section shows a file count so you know how many components are stored.
- Click into any design system to browse its sections and components.
Remove a component from a section
- Navigate to the section within your design system.
- Select the component you want to remove.
- Click Delete.
- Confirm in the modal.
Delete a design system
- Navigate to the design system you want to delete.
- Click Delete Design System.
- Confirm in the modal.
Who can change a design system
On an Email Love Builder workspace, everyone can browse the workspace’s design systems and build emails from their components. Changing a design system takes the Design System Admin right. A workspace owner turns it on for each member, per workspace, in Email Love Builder. Workspace owners always have it. Without the right:- Manage your design systems doesn’t appear in the design system dropdown, so you can’t create a design system.
- Upload is disabled. Hover it to see “Only a Design System Admin can upload components. Ask a workspace owner to enable it for you.”
- The delete × on components is hidden.
- Sync Template Design doesn’t appear in AI Studio.
- In the Email Love Builder export, + Create New Design System and the sync button don’t appear.
- In the Customs tab, you can’t add templates, create categories, or delete. See The Customs tab.
FAQ
Do I have to upload components into every section? No. AI Studio only uses sections that have components saved. Empty sections are skipped during generation. Only fill the sections that matter for your email type. What happens to my saved component if I edit the parent in Figma? The saved component updates automatically. Components stay linked to their Figma parent, so visual tweaks (color, image, spacing) flow through without a re-upload. Only structural changes need a re-upload. Can my teammates use the design systems I create? Yes. Design systems are shared across everyone on the same license key, so anyone on your team using the same license sees the same design systems. Who can delete components and design systems? On a team workspace, a component can be deleted by the person who uploaded it or by the workspace owner. Members also need the Design System Admin right. Deleting an entire design system is owner-only. Accounts using a Gumroad license key don’t have roles, so these rules don’t apply to them. I can see the design systems but can’t upload or create anything. Why? You don’t have the Design System Admin right on this workspace. You can still browse and build emails from the components. Ask a workspace owner to turn the right on for you. See Who can change a design system. I belong to more than one workspace. What happens when I switch? Everything switches with you. The design systems, saved templates, and AI Studio state you see all belong to the workspace you’re currently in, and anything you create after switching is saved to that workspace. Your plan and monthly limits switch too, and so does the Design System Admin right, which is set per workspace. What’s the difference between using a design system with the Builder vs. AI Studio? Email Love Builder is for humans: your team picks and arranges components in a drag-and-drop builder. AI Studio is for automation: you give it a campaign brief and it assembles the email from your components. Same design system, two different ways to use it. Can I have more than one design system? Should I? Yes, and usually you should. Create one per brand, sub-brand, or distinct email type (e.g. marketing vs. transactional). It keeps your components clean and helps AI Studio pick the right look for each email. Why is the Upload button greyed out? Your selection isn’t a shape Upload accepts. It takes a Wrapper, a whole email frame, or several of those at once. A Section inside a Wrapper, a Column, a hero frame, a button or a text layer will leave it disabled. Click the parent Wrapper and it becomes clickable. More on the two shapes in modules vs. email templates. Should I put a single Wrapper in the design system, or save it to Customs as a template? The design system, every time. Customs is for whole finished emails. A Wrapper saved as a one-block email won’t appear in any design system section, won’t sync to AI Studio or Builder, and will overwrite the theme colours of whatever email someone inserts it into. Full explanation here. Can I create my own custom sections beyond the 13 predefined? No. The 13 predefined sections are fixed. They’re how the plugin and AI Studio know which component goes where. Pick the section that best matches each component’s purpose. Do I need to re-sync every time I add or update a component? For AI Studio and Builder: yes. Re-sync after you upload new components or change existing ones, so the latest state is available for generation. For human-driven use inside the Figma plugin, no re-sync is needed. What’s the “Default” design system? Should I use it or create my own? Default is a starter design system that’s available out of the box. It’s fine for getting a feel for the plugin, but for real work most people create one per brand so each system reflects their own visual identity. How do I move a component from one section to another? There’s no direct move action. Delete it from the current section, then re-upload it to the right one from the Figma canvas. What happens if I delete a design system by mistake? Deletion is permanent. The design system and all its components are gone. You’d need to recreate the design system and re-upload your components from Figma. Be sure before you confirm.Best practices
- Name things clearly. Descriptive names on design systems and components help your team find the right pieces and help AI Studio match them to the right sections of a brief.
- Keep components modular. Each component should work on its own. That gives AI Studio and the Builder maximum flexibility when assembling emails.
- Re-sync when you change components. Update designs in Figma, then re-upload and re-sync so the latest state is available for AI generation.
- One design system per brand. Managing multiple brands? Give each its own design system to keep the look consistent.
Troubleshooting
Upload fails for a component: Make sure the component is properly selected on the Figma canvas before clicking Upload. Try selecting it again and re-uploading. Upload is disabled and clicking does nothing: Hover the button first. If it shows a Design System Admin message, it’s a permission, not a problem with your selection. Ask a workspace owner for the right. Otherwise it’s a selection problem, not a failure. Upload accepts a Wrapper, a whole email frame, or several of those at once. Select the parent Wrapper of whatever you’re trying to save. Sync stalls or fails: Refresh the plugin and try again. Empty sections are fine (they’re skipped during generation), but a fully empty design system can’t be synced. Make sure at least one section has components saved. Components look different after syncing: The design system captures the current state of components at the time of upload. If you’ve made structural changes in Figma since uploading, re-upload the updated components and sync again. Team members can’t see the design system: Design systems are shared across the same license key. Make sure your team members are logged in with a license under the same account.Related Articles
- Pre-Built Components: Browse the available pre-built components in the plugin
- Saving Custom Components in the Plugin: How to save individual custom components
- Sync your emails to Email Love Builder: Use your design system with the Builder’s drag-and-drop interface