

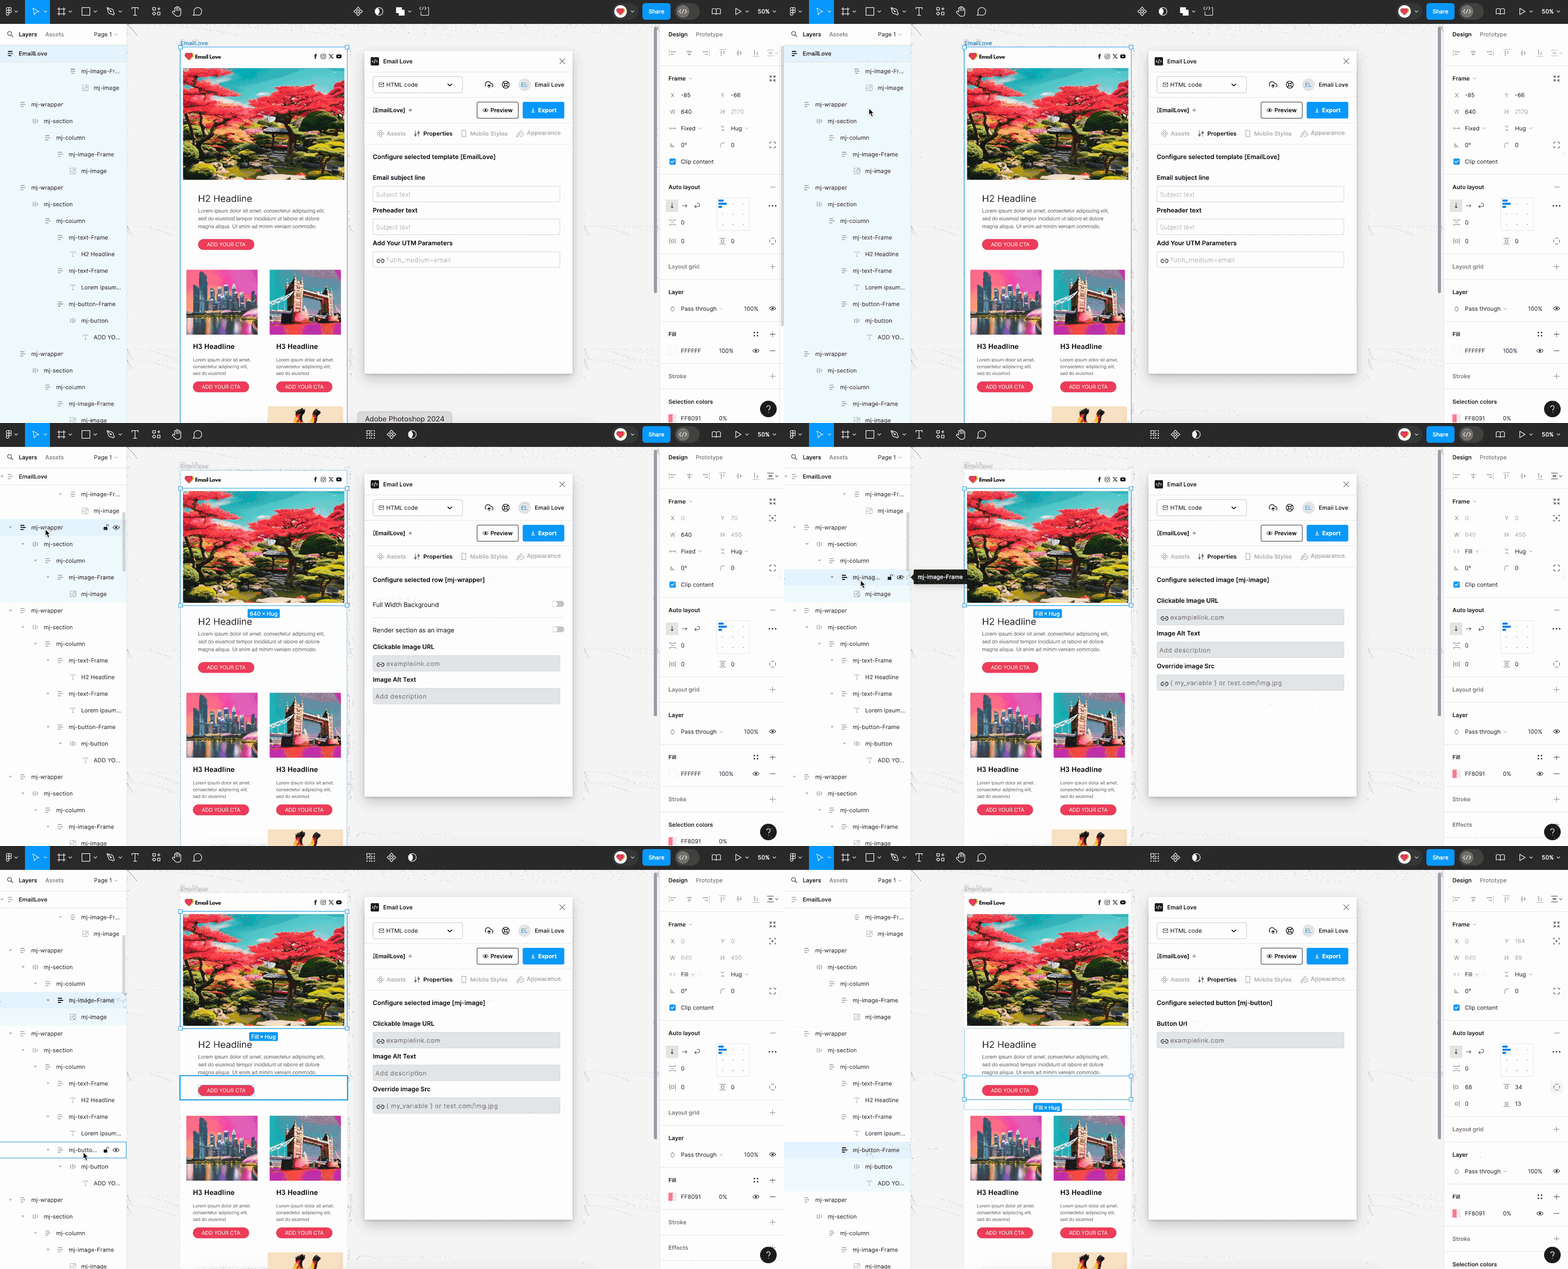
Layers that Support Properties
Before everything else, you will need to select a layer that you would like to apply properties to. The following layers are supported:- Frame: Add a subject line, preview text, or UTM parameters to your overall email frame.
- mj-wrapper: Enables you to turn a section into an image, add a URL, or add a full-width background
- mj-image-frame: Add an image URL, alt text, or outside image destination URL
- mj-button-frame: Add a URL to your button
Using the Properties Tab
- Select the Properties tab within the Plugin interface.
- Select the layer from the list on the left of the Figma interface. The options displayed under the Properties tab change depending on the selected layer.
To Apply Properties to a Frame
When you select an entire frame, you can:- Add a subject line and preheader text to the frame.
- Add UTM parameters to any URLs within the frame to track email campaign performance.
To Apply Properties to a Wrapper
When you select a wrapper, you can:- Add background color extending across an email’s entire width.
- Render a section of the email as an image.
- Add a URL and alt text to any images within the wrapper.
Apply Properties to an Image or Button
When you select an image or a button within a wrapper or frame, you can:- Add a URL to make the image or button clickable
- Add an optional Alt Text to the image
- Merge in an external image source by entering the URL of an image hosted on a website. This allows for a dynamic image that pulls from the external source.
Step-by-Step Instructions
1
Select the frame you want to edit
The Properties tab will update to show options for adding a subject, preheader, or UTM parameters.
2
Click on a wrapper within your frame
The Properties tab will update to allow changes to the background color and render the content in a wrapper as an image.
3
Click on a button
Add a URL link to it via the Properties tab.
4
Click on an image
Add a URL, alt text, or merge an external image source.
Example Usage
- Frame Properties
- Add a subject line like “Welcome to Our Newsletter” and preheader text such as “Stay updated with the latest news.”
- Include UTM parameters for better tracking:
utm_source=newsletter&utm_medium=email&utm_campaign=spring_sale.
- Wrapper Properties
- Turn the content in a wrapper into an image
- Add a full-width background color
- Image Properties
- Link an image to a specific product page and ensure it has descriptive alt text.
- Use a URL of an image hosted on your website for dynamic content that updates automatically.
Links Included in Your Email
At the bottom of the Properties tab you’ll find a Links included in your email section: a numbered list of every URL in the selected template, so you can review and edit all your links in one place without clicking through each layer. Each row shows the linked text or layer name, plus an editable URL field:- Edit any URL inline. Changes sync back to your design automatically a moment after you stop typing.
- Validation built in. If you enter an invalid URL, a red “Please enter a valid URL or merge tag” message appears and the change is not applied until you fix it. Web URLs,
mailto:andtel:links,#anchors, and ESP merge tags are all accepted. - Bare domains are completed for you. Type
example.comand the plugin saves it ashttps://example.com, so your exported HTML never contains a relative link.
Merge Tags as Link Destinations
You can use an ESP merge tag as any link’s destination, perfect for unsubscribe links, preference centers, and view-in-browser links. Type the tag into the link’s row in the list and it exports exactly as written. All of the common syntaxes are accepted:{{ var }}: HubSpot, Braze, Iterable, Customer.io, generic Handlebars{% var %}: Klaviyo, Liquid*|VAR|*: Mailchimp%%VAR%%: Salesforce Marketing Cloud, Pardot{var},%VAR%,${var},<<VAR>>,[VAR]: other platforms
- Text links work too, even though Figma rejects merge tags as hyperlinks. Give the text any placeholder link in Figma first (that’s what makes it appear in the list), then replace the URL with your merge tag in the list. The plugin stores the tag itself and swaps it in at export, so the exported HTML contains the tag while your Figma file keeps the placeholder.
- Braze tags with a variable inside work too. Tags like
{{${email_unsubscribe_url}}}or{{preference_center.${Your_Preference_Center}}}are kept exactly as written. Count the braces: a tag with${inside ends with three closing braces,}}}. With only two, the plugin can’t tell it’s a merge tag and addshttps://in front. - UTM parameters are never appended to merge tags. A campaign UTM setting won’t corrupt
{{unsubscribe_url}}into{{unsubscribe_url}}?utm_.... - Plain text can’t be tagged directly. Text with no link never appears in the list, so always add a placeholder link in Figma first.